How to correctly configure SSH keys for Statamic (v3) Git Integration
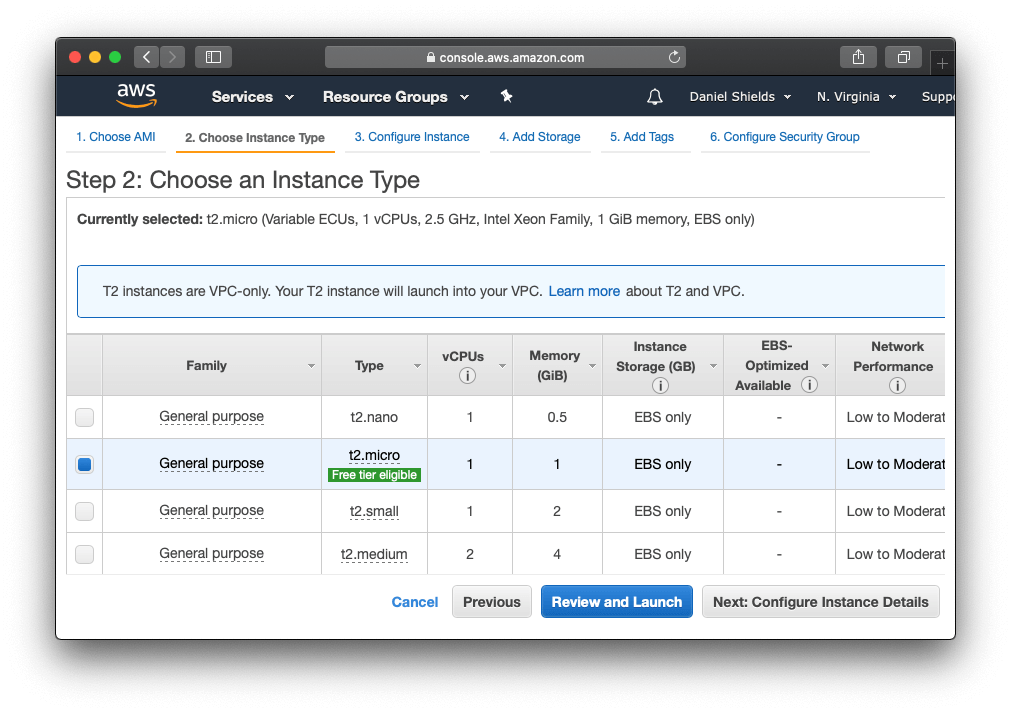
Launch EC2
To get started we need to launch our EC2 instance on Amazon. We'll use a Amazon Linux 2 AMI (x86) image on the t2.micro plan because it's included in the free tier. Click Review and Launch and we'll configure the rest later.
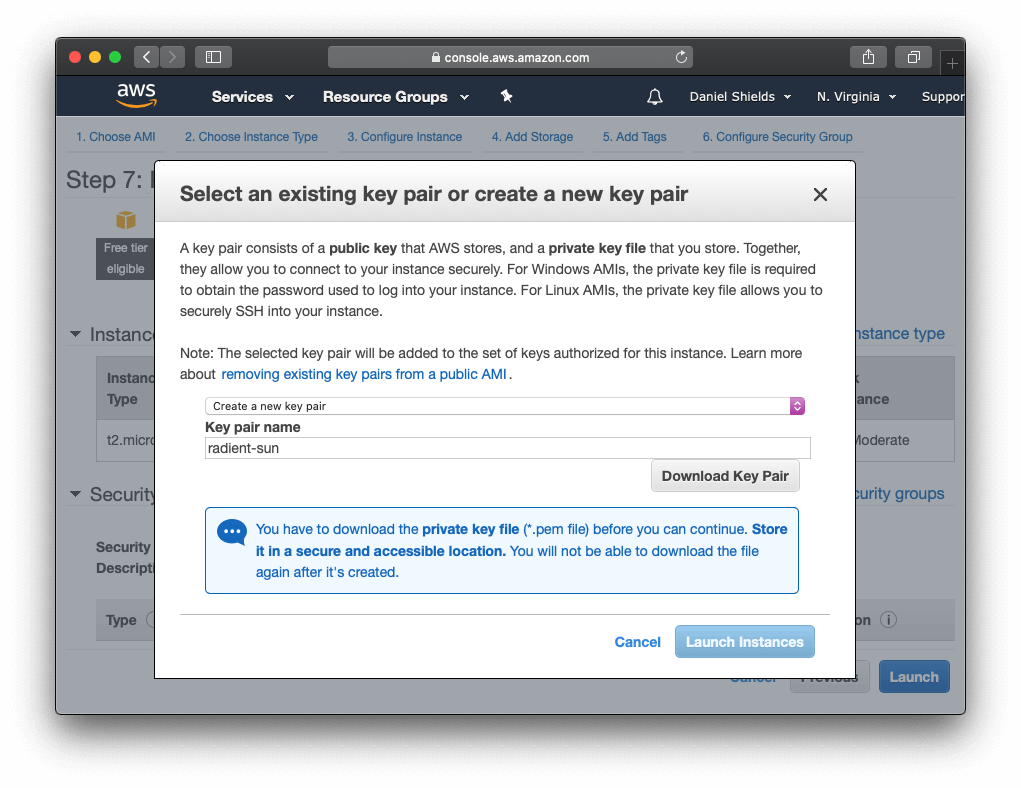
You'll be asked to download a new key pair, and we'll use this to SSH into the server. I'll call mine radiant-sun for this gist. You'll need to keep this secure, so move it to a safe place.
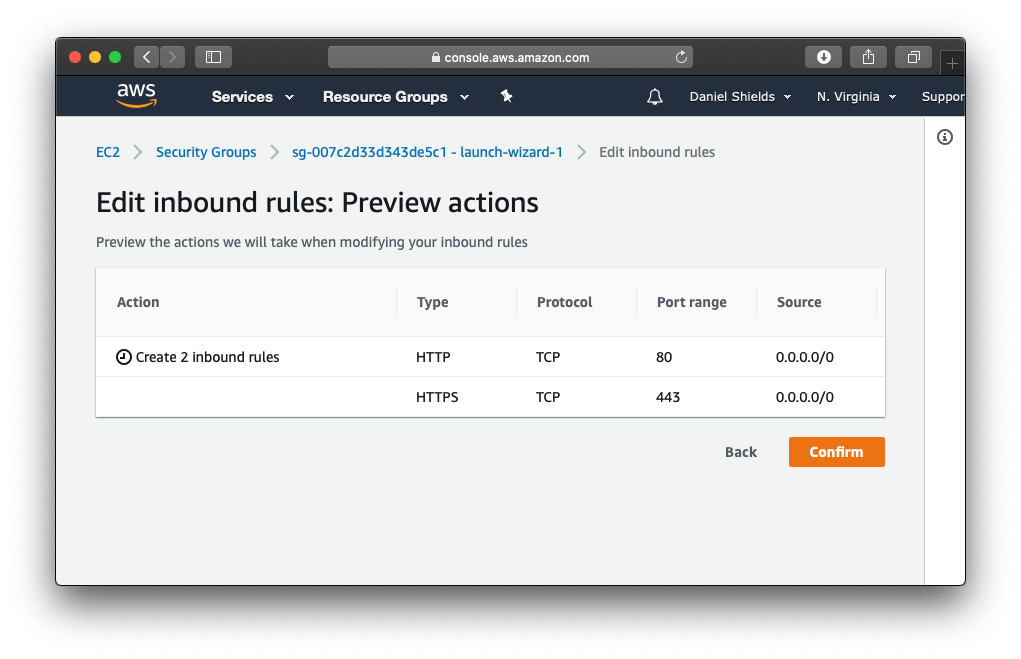
Edit Security Groups
The next thing we want to do is edit the default security group, if you haven't already created one. All we want to do is add HTTP and HTTPS access to our inbound rules, and we can remove HTTP access once we set up SSL certificates later.
Accessing server
First, you need to make your Key Pair file secure (read-only and not accessible by others) by entering:
chmod 400 radiant-sun.pem
Then, access your instance using your Key Pair file and the IPv4 Public IP of your EC2 Instance:
ssh -i radiant-sun.pem ec2-user@[EC2 Instance IPv4 Public IP]
After the instance is finished launching, you can find the IPv4 address on the EC2 Instances page.
Configure server
Let's get started and update the new server.
sudo yum update -y
Setup Apache
We're going to use Apache to run the Statamic website, so next we'll install Apache and SSL module.
sudo yum install httpd mod_ssl -y
Check if Apache is running
sudo systemctl is-enabled httpd
If it returns "disabled", which it should the first time... enable Apache so it starts each time the system boots.
sudo systemctl start httpd && sudo systemctl enable httpd
Otherwise, normally you can just restart Apache like this if needed
# sudo systemctl restart httpd
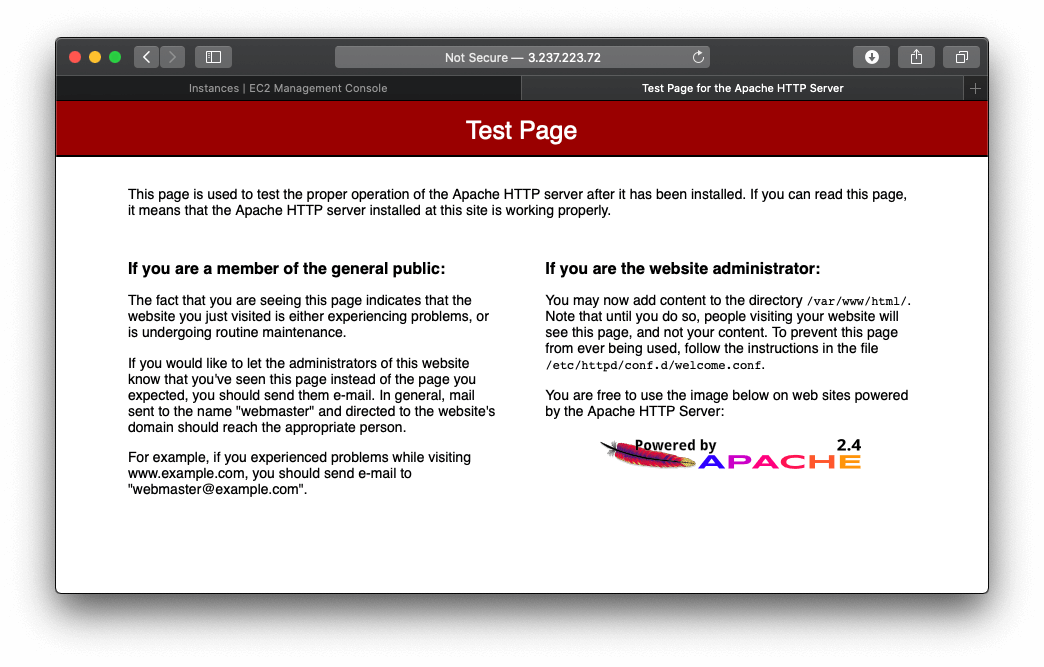
If you visit the server IPv4 you should now see the Apache test page.
Install PHP 7.4
sudo amazon-linux-extras enable php7.4
sudo yum install php-cli php-pdo php-fpm php-json php-mysqlnd php-mbstring php-dom php-bcmath php-gd php-redis -y
Install Git
sudo yum install git -y
Adjust PHP memory
One last thing we need to do before we continue to update the memory limit or we'll have problems when we try composer install the project later on.
Update the PHP memory limit in /etc/php.ini or run php --ini to find your config file if you're using a different type of server.
memory_limit = 1G (or more if the system allows)
Our tiny t2.micro server only has 1GB of ram but we need to push it to the limit to run Laravel and Statamic, otherwise our composer installations fail.
And finally restart php:
sudo service php-fpm restart
Install NodeJS and NPM
Install Node and NPM so it's available to all users.
sudo yum install -y gcc-c++ make
curl -sL https://rpm.nodesource.com/setup_14.x | sudo -E bash -
sudo yum install nodejs -y

node -v
npm -v
Setup NPM cache
sudo mkdir /usr/share/httpd/.config
sudo chown -R ec2-user:apache /usr/share/httpd/.config
sudo chmod 777 -R /usr/share/httpd/.config
Install Composer
sudo curl -sS https://getcomposer.org/installer | sudo php
sudo mv composer.phar /usr/local/bin/composer
sudo ln -s /usr/local/bin/composer /usr/bin/composer
Setup Composer cache
Something else we need to do to let composer run under the apache user is create a cache directory and make it writable:
sudo mkdir /usr/share/httpd/.cache
sudo chown -R ec2-user:apache /usr/share/httpd/.cache/
sudo chmod 777 -R /usr/share/httpd/.cache
This prevents these errors from appearing when we run composer install later on.
Cannot create cache directory /usr/share/httpd/.cache/composer/repo/https---repo.packagist.org/, or directory is not writable. Proceeding without cache
Cannot create cache directory /usr/share/httpd/.cache/composer/files/, or directory is not writable. Proceeding without cache
Setting up Github and SSH Access
Now we're ready to start setting up the SSH keys so we can clone our project and configure them so Statamic can push back changes on the control panel back to git. This is the Git Integration available in Statamic v3, but these steps should work for anyone having trouble with Statamic v2 and Spock.
Create SSH directory
They key to get this working with Statamic is to make Apache the owner of the website and SSH keys, otherwise Statamic will fail with this common error:
Git Process: Host key verification failed.
Git Process: fatal: Could not read from remote repository.
Please make sure you have the correct access rights and the repository exists.
Since the Apache SSH folder it doesn’t exists by default on the Amazon AMI, let's create it.
sudo mkdir /usr/share/httpd/.ssh
sudo chown -R apache:apache /usr/share/httpd/.ssh
Normally we would use the ~/.ssh folder, which the server will still use for normal SSH functions, and so you can SSH into the server. So it's important that ~/.ssh is owned by ec2-user and /usr/share/httpd/.ssh is owned by the apache user.
I'm using user apache here but this may differ if you're on another server type. So you can always check who the apache user is before assigning the users.
You can either try:
ps aux | egrep '(apache|httpd)'
Otherwise this should automate the process and print the apache user:
ps -ef | egrep '(httpd|apache2|apache)' | grep -v `whoami` | grep -v root | head -n1 | awk '{print $1}'
Generate key for apache user
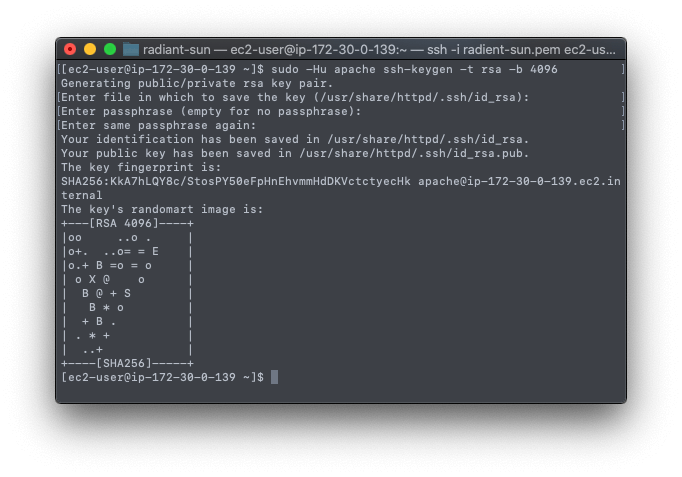
When you are asked for the passphrase, just press enter to make a key without a password.
sudo -Hu apache ssh-keygen -t rsa -b 4096 # chose “no passphrase”
When you run this command from the root directory, it should generate the keys in the correct folders.
Your identification has been saved in /usr/share/httpd/.ssh/id_rsa.
Your public key has been saved in /usr/share/httpd/.ssh/id_rsa.pub.
Otherwise move the keys there manually.
sudo mv /home/ec2-user/.ssh/id_rsa /usr/share/httpd/.ssh/
sudo mv /home/ec2-user/.ssh/id_rsa.pub /usr/share/httpd/.ssh/
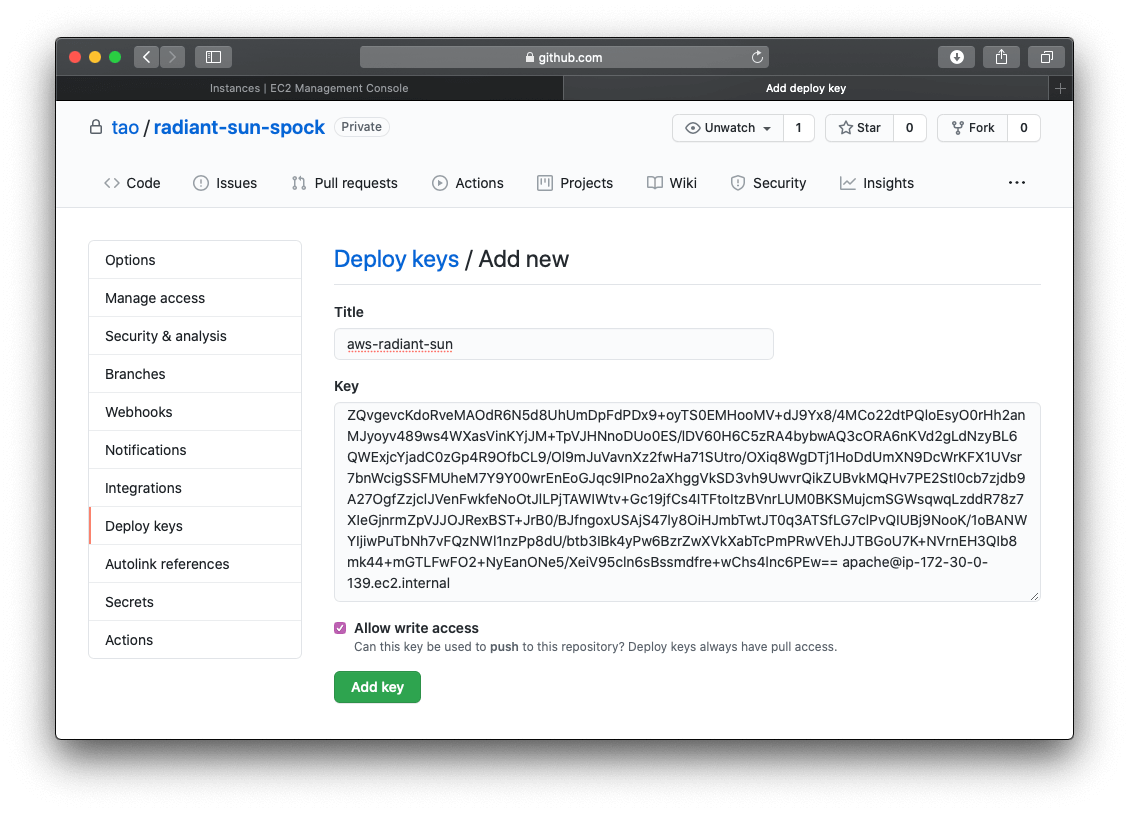
Now, you'll need to add the key as a “deploy key” to your project on GitHub.
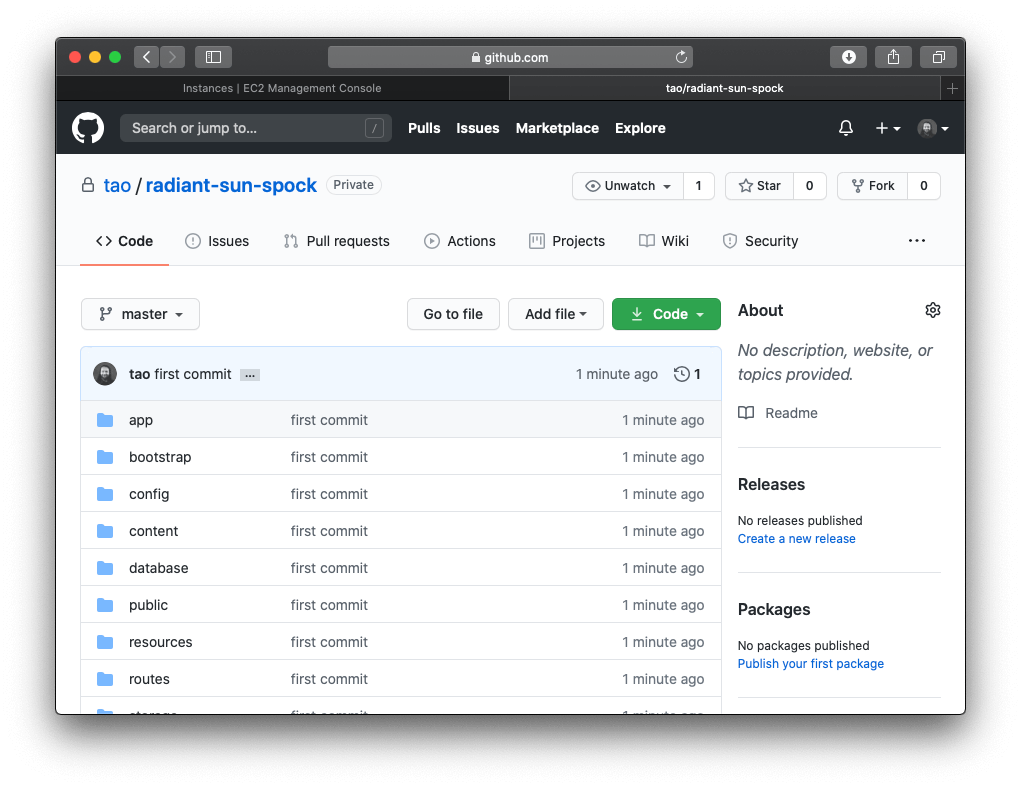
For the rest of the tutorial, I'll clone the Statamic Cool Writings demo and use that.

All I'm doing here is cloning the project to my local machine so I can push it to my private repository.
git clone git@github.com:statamic/statamic-starter-cool-writings.git cool-site
cd cool-site
rm -rf .git
git init
composer install
git add .
git commit -m "first commit"
git remote add origin git@github.com:tao/radiant-sun-spock.git
git push -u origin master
One important thing to note here is that I run composer install before I commit the project, that's because we need a composer.lock file as our tiny server doesn't have enough memory to do this itself.
Now, log back into the server if you need to and let's add the keys to GitHub. For the tutorial I'm just going to cat the key and paste it.
cat /usr/share/httpd/.ssh/id_rsa.pub
As we want to use Spock to push back changes to the Git repository, we also need to allow write access when we add the key.
Now let's set up the ssh configs on the server
sudo -u apache touch /usr/share/httpd/.ssh/config
sudo -u apache chmod 600 /usr/share/httpd/.ssh/config
Add these configs to our new config file:
Host *
  HostName github.com
  IdentityFile /usr/share/httpd/.ssh/id_rsa
  IdentitiesOnly yes
Now comes the magic command to make this all work. Since Apache owns our website, and runs the git push when we make changes on the Statamic Control Panel, we need apache to make the connection to Github. It's important to run this step so that the known_hosts file is created.
sudo -u apache ssh -T git@github.com
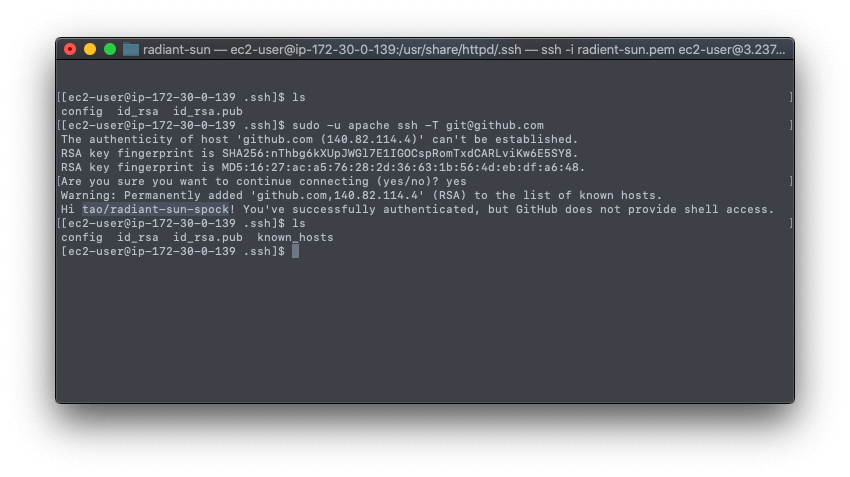
If you've done everything correctly so far, you should see that Github authenticated our apache SSH key and creates the new known_hosts file.
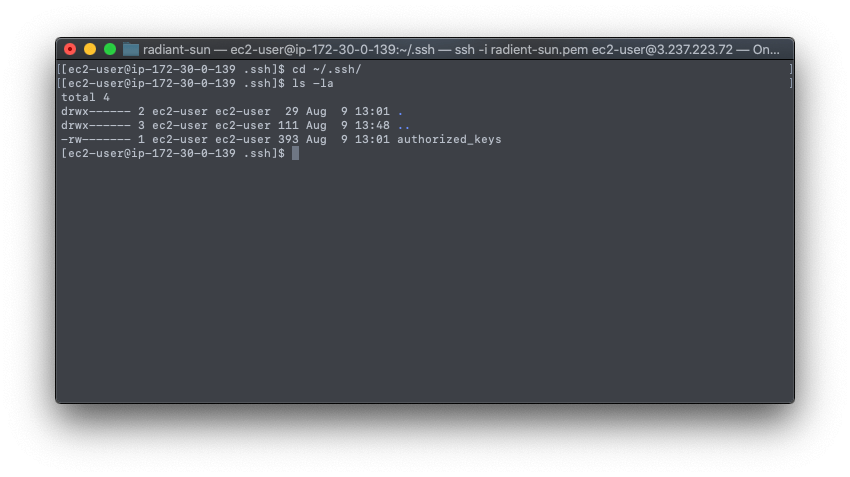
Now we have our /usr/share/httpd/.ssh folder which has all the SSH configs for apache, and is correctly authenticated with GitHub... and we have our default ~/.ssh folder owned by ec2-user which still allows us to SSH into the machine with our radiant-sun.pem key pair we created earlier.
Now, it’s important that authorized_keys and authorized_keys belong to ec2-user otherwise you won’t be able to ssh into the machine
You can confirm this by checking the ~/.ssh folder permissions.
Clone the repository
Now let's clone the private repository of Cool writings from Github and set-up our website.
cd /var/www/html
sudo -u apache git clone git@github.com:tao/radiant-sun-spock.git .
Install and setup project
Install and prepare assets
composer install
npm install
You might expect this to work but it won't unfortunately we have a very tricky issue EACCES: permission denied to overcome first.
sudo chown -R $USER:apache /var/www/html
sudo chmod 775 /var/www/html
Now try it again and it should work fine.
composer install
npm install
npm run production
If you still have problems: try add the ec2-user to the apache group:
groups ec2-user

sudo usermod -a -G <groupname> <your_username>
sudo usermod -a -G apache $USER

groups ec2-user
Prepare Laravel
cp .env.example .env
php artisan key:generate

sudo chmod -R 775 /var/www/html/bootstrap/cache
sudo chmod -R 775 /var/www/html/storage

php please cache:clear
php please stache:warm
Setup Apache2
Add this to the bottom of /etc/httpd/conf/httpd.conf
Alias / /var/www/html/public/
<Directory "/var/www/html/public">
        AllowOverride All
        Order allow,deny
        allow from all
</Directory>
Then add this to public/.htaccess under "RewriteEngine On" (if it doesn’t exist yet)
RewriteBase /
You can then edit public/.htaccess for any additional changes.
sudo systemctl restart httpd
If you visit our site now, you should see an error about our Apache folder permissions:
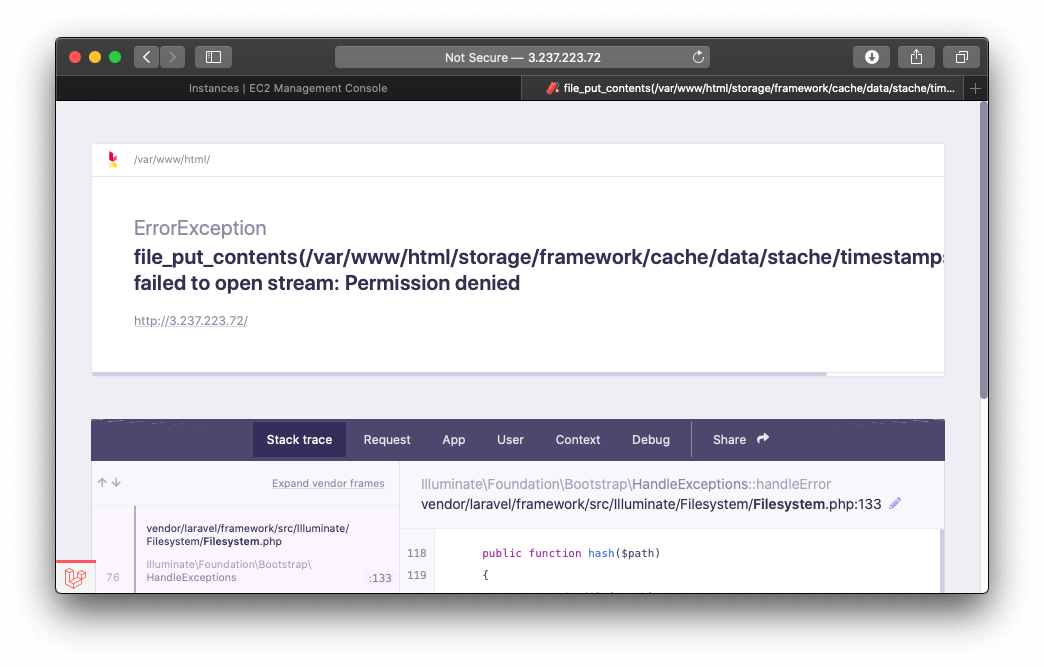
To resolve this for now, let's use this to fix the permissions of the storage folder:
sudo chown -R apache:apache storage/framework
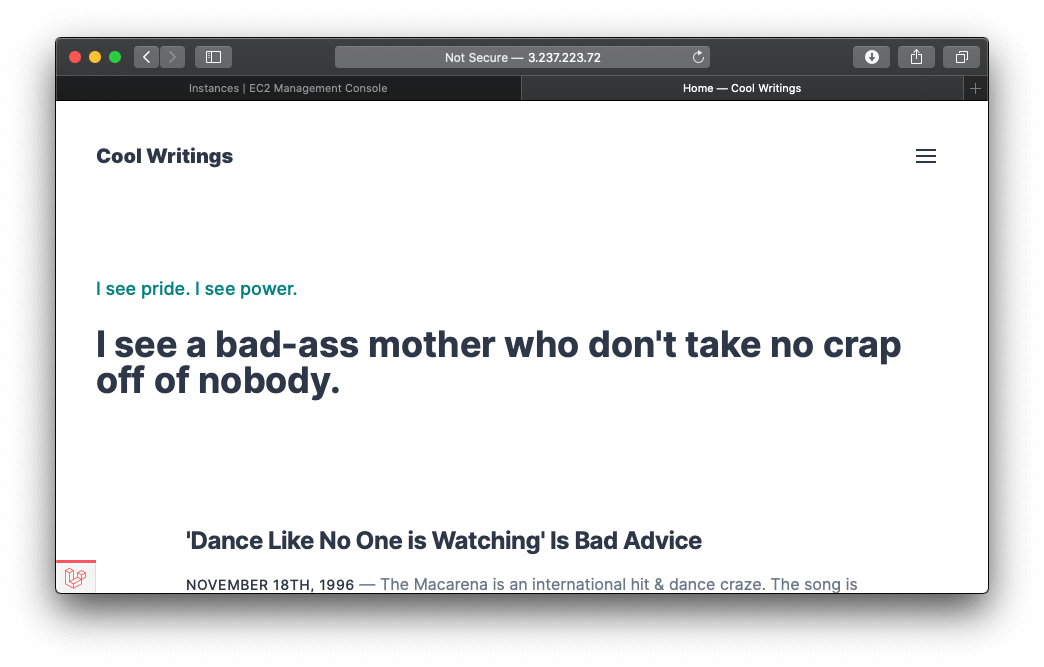
Nice! Our sites running.
Statamic Control Panel
Now let's add a Statamic user and test the control panel:
php please make:user
Testing GitHub Integration
If you are back in the /var/www/html folder and run git status you might notice some files have changed or been modified... for instance we added RewriteBase / to our .htaccess file. To start with a clean slate, let's commit and push these changes.
But first, we need Statamic Pro enabled if we haven't done so yet. So add this to config/statamic/editions.php.
'pro' => true
And update the .env file according to the Statamic Git Integration docs, and it's best practice git ignore the .env!
STATAMIC_GIT_ENABLED=true
STATAMIC_GIT_AUTOMATIC=true
STATAMIC_GIT_PUSH=true
Now let's stash the changes and commit.
sudo -u apache git add .
sudo -u apache git commit -m "Stash"
sudo -u apache git push
You should now see a clean git state if you run git status
On branch master
Your branch is up to date with 'origin/master'.

nothing to commit, working tree clean
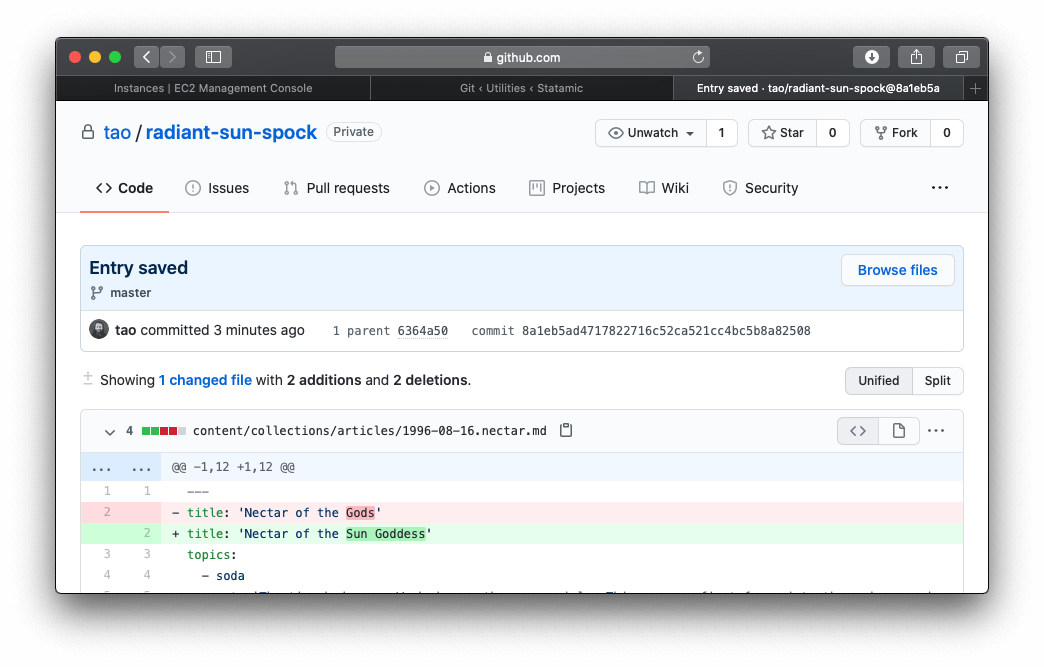
Since we set up the SSH keys before, if we make a change on the CMS we should see Statamic push this to GitHub.
Now, there may be a bit of a delay before Statamic actually pushes to GitHub, so give it a few seconds before you check, and maybe longer depending on the type of queue and size of the website.
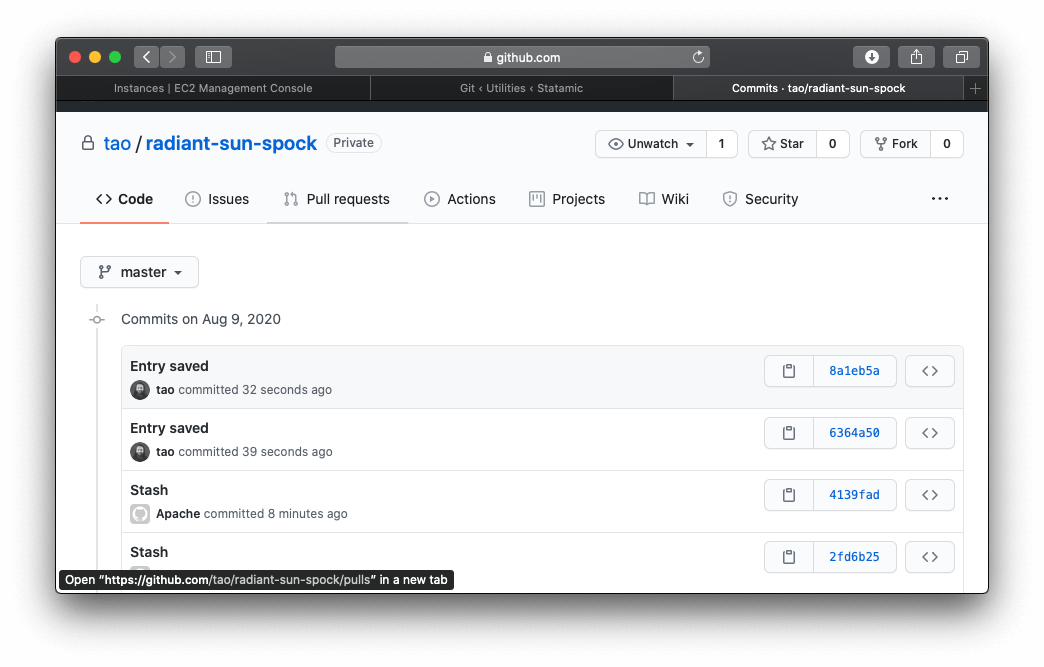
And there you go... Statamic automatically detected the changes for us and pushed to GitHub. Now there's still some work to do so Spock can use the correct Author name, and we need to work on a pipeline to deploy changes back to EC2 when you merge pull_requests onto the master branch, but so far our Git Integration is working well.
Deploying Changes
When a pull request is merged onto the master branch, we want the website to update the changes. I have set up a simple script to run using GitHub webhooks to allow the code to update itself. While not related to the tutorial, there are some permission issues that are still unsolved: trying to get the apache user to run npm and yarn commands.
As a brief example this is my deploy script:
#!/bin/bash
cd /var/www/html
echo 'Starting merge as' $(whoami)
php artisan down
git pull origin master
composer install --no-interaction --no-dev --prefer-dist
php artisan cache:clear
php please stache:refresh
php artisan up
When a webhook is received from GitHub, we validate to ensure it's from a closed pull request and the shell script is run as a background process that lets the code self-update.
# prepare the shell script
$cmd = 'sh /var/www/html/scripts/pull-changes.sh';

# save output to console.log (useful for debugging)
exec('touch /var/www/html/storage/logs/console.log');
system($cmd . ' > /var/www/html/storage/logs/console.log 2>&1 &');

# run without output (optional)
# system($cmd . ' > /dev/null 2>&1 &');
This works fine for my example, but a bit difficult to get set up initially trying to debug and configure everything correctly... as you can't pull a new script if the old deploy script isn't working correctly.
As you can see the script doesn't call npm install or npm run prod because of a permission issue where npm and nvm make it difficult by design to allow other users to run these commands. So to overcome this I generate the stylesheets and assets with a GitHub action during testing and deploy them to my S3 bucket.
Add HTTPS
We installed mod_ssl earlier with Apache, now we can enable it.
Your instance now has the following files that you use to configure your secure server and create a certificate for testing:
/etc/httpd/conf.d/ssl.conf

The configuration file for mod_ssl. It contains directives telling Apache where to find encryption keys and certificates, the TLS protocol versions to allow, and the encryption ciphers to accept.

/etc/pki/tls/certs/make-dummy-cert

A script to generate a self-signed X.509 certificate and private key for your server host. This certificate is useful for testing that Apache is properly set up to use TLS. Because it offers no proof of identity, it should not be used in production. If used in production, it triggers warnings in Web browsers.
Generate the test certificate.
cd /etc/pki/tls/certs
sudo ./make-dummy-cert localhost.crt
This generates a new file localhost.crt in the /etc/pki/tls/certs/ directory. The specified file name matches the default that is assigned in the SSLCertificateFile directive in /etc/httpd/conf.d/ssl.conf.
This file contains both a self-signed certificate and the certificate's private key. Apache requires the certificate and key to be in PEM format, which consists of Base64-encoded ASCII characters framed by "BEGIN" and "END" lines, as in the following abbreviated example.
Open the /etc/httpd/conf.d/ssl.conf file and comment out the following line, because the self-signed dummy certificate also contains the key. If you do not comment out this line before you complete the next step, the Apache service fails to start.
SSLCertificateKeyFile /etc/pki/tls/private/localhost.key
Restart Apache.
sudo systemctl restart httpd
If the website works on HTTPS, we can now obtain a CA-signed Certificate. You can follow the steps here: https://docs.aws.amazon.com/AWSEC2/latest/UserGuide/SSL-on-amazon-linux-2.html
We will use Let's Encrypt Certbot.
First, point your domain name to the website if you haven't already, because the Let's Encrypt bot checks against the domain name, and then follow the Amazon instructions to set up the certificate. It only takes a few minutes after the domain is correctly pointing at your site.
Remember to remove HTTP access on the AWS security group.